I usually don't make New Year resolutions, but this year I decided to resolve to:
1) Go places by myself if I have no one to go with me
2) See a gender therapist
3) Eat more protein
4) Bulk up my arms and shoulders
5) Get better at Portuguese
6) Gain inner balance
Monday, December 31, 2012
Thursday, December 27, 2012
Turtles

I found this beauty in my driveway last spring; I carried her down to where the creek empties into the swamp in my backyard so she wouldn't get run over.

These guys used to fight over bread that I'd throw into the water for them. I never knew turtles ate bread before--I was originally throwing in bread for the birds but the turtles would swim up and steal it before the birds got to finish.

They live in a lake behind an apartment building I used to live in down South.

Wednesday, December 26, 2012
Boy Shoes
I went to Target and picked up a pair of Boy's size 5 black dress shoes for work, and some Swiss Gear sneakers. Yay! My girl shoes are so worn that there's a hole in the bottom, so it was about time to get new sneakers. I am also glad to get the dress shoes, because it can get annoying wearing high heels at work all day, especially now that we will be getting snow and ice.
I also grabbed a pair of boy's size 14 khakis that were on sale, and a boy's size large button up shirt. I tired on a large sweater, but it was huge on me, and then I tried on the same sweater in medium but is was too tight on my arms yet I had bat wings by the arm pits.

I also grabbed a pair of boy's size 14 khakis that were on sale, and a boy's size large button up shirt. I tired on a large sweater, but it was huge on me, and then I tried on the same sweater in medium but is was too tight on my arms yet I had bat wings by the arm pits.
Tuesday, December 25, 2012
Ya'ah'teeh Keshmish
I hope everyone had a nice Christmas, I know the holidays can be a tough time for anyone, but especially LGBT folks.
I spent most of the day cooking dinner. I made my own naan on Sunday, and some Amandine yesterday. For the Amandine, I followed the recipe in the link exactly except that I added about a teaspoon of Almond extract to the filling along with about a handful of almonds that I crushed into a fine powder.

So today, I made some Persian Pomegranate Soup, some Stuffed Lenten Eggplants, quinoa with cranberries and almonds, homemade hummus, and then the turkey smothered with curry powder. Oh, and a pumpkin pie... it's basically a mandatory dish along with homemade whipped cream. I got tons of compliments about how well the turkey came out, everyone said it was perfectly cooked, so it goes to show that the breaking down method is the best way to go about cooking the bird, and it only took 1 hour and 45 minutes to cook even though it was a 19 pound turkey.

Friday, December 21, 2012
Wednesday, December 19, 2012
The Only Way to Cook a Bird -- Break Her Down
Tired of having dried turkey? Sick of having to drench the poor thing in gravy just to get it down? Well, if you try this method, you'll never have dried poultry again. Thanks to Chris Kimball's Fannie's Last Supper I discovered this method, and ended up making a mouth watering and picture perfect goose for Christmas last year, and then a duck for Thanksgiving this year.
My family eats turkey for Christmas (even last year when I made the goose, we still had a back-up turkey), so this is what I am going to show you how to prep step-by-step for your holiday meal. Breaking the bird down and cooking the breasts separately from the rest of the bird works better, because the white meat (found in the breasts) finishes cooking at a lower internal temperature than the dark meat. Cooking them both together the traditional way overcooks the breasts. By cutting the breasts off and pan searing them you'll get the best flavor from your white meat without overcooking it, and then roasting the rest of the bird until it reaches its proper temperature will ensure that your entire bird is delicious. Also, it cooks a lot faster this way.
I'll add pictures to this post once I start prepping this turkey, since it is currently thawing.
You will need: one thawed turkey (or other whole bird of your choice); a few sharp knives; kitchen scissors; salt and pepper; plastic wrap; Ziploc bags; paper towels; salt and pepper; salt pork; vegetable oil
Note: This should be done about one to two days before you plan on cooking the bird, but doing this last minute probably won't make much of a difference.
You will want to cut each breast off separately. To do this, use a sharp carving or butcher knife and cut the entire left/right breast off by keeping your knife as close to the bone as possible.
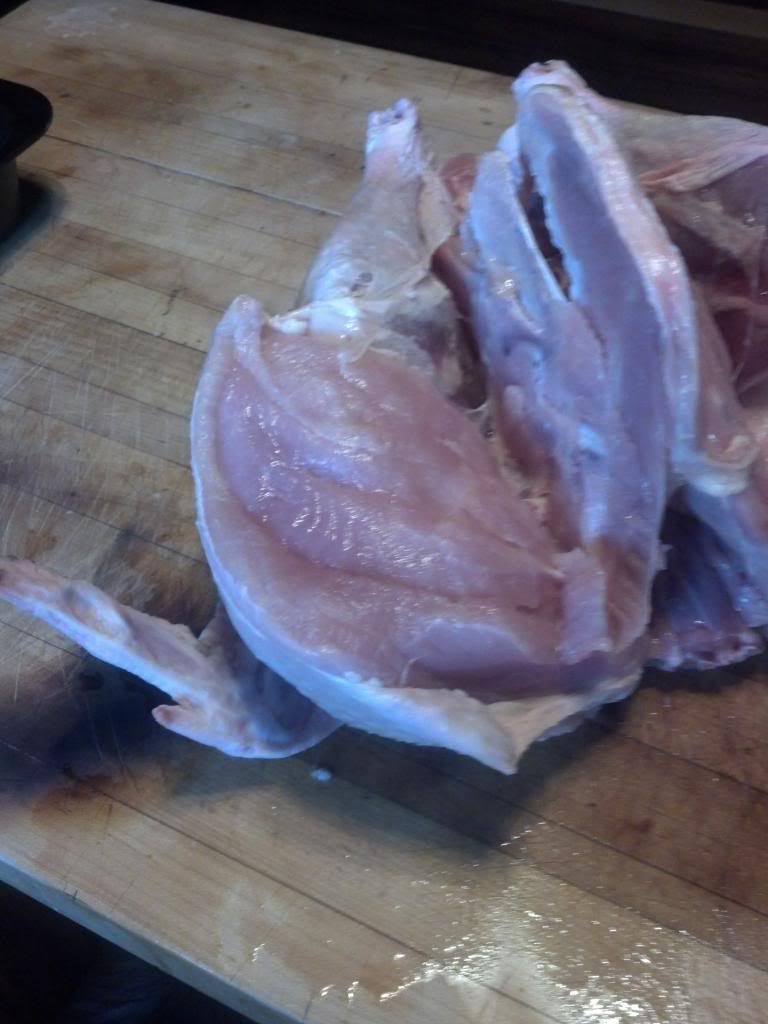
Once it's cut along the bone, remove the breast by cutting the skin, fat, cartilage, etc. that is keeping it in place. Dry this piece with a paper towel, and place skin side down on plastic wrap. Repeat with the other side. Salt and pepper the breasts, wrap them up, and put them in a zip lock bag. Refrigerate.
If you dislike the skin, take the opportunity now to cut it off. I find the best way to remove bird skin is to start cutting with a small, sharp knife keeping the knife slightly angled toward the skin. Once it is started, I think it is easier to just remove the bits keeping the skin on with a pair of scissors. If you do remove the skin, only pan sear each side for two to three minutes.
Turn the bird over so the spine is facing up. Break the bird's back. Believe me, this sounds a lot easier than it actually is. You'll have to struggle with it for awhile, unless you are incredibly strong. It's helpful to have a friend hold one end while you bend the spine. Using a sharp knife, position it in a small space where the break is, and start cutting or pushing away. You can either discard the top carcass after reserving the wings, or save it to roast with the legs (as Chris Kimball recommends).
Note: This turkey's back was actually really easy to break, maybe you'll get lucky too.
Your bird is now broken down, and ready to cook in a day or two.
Remember to disinfect your work surface with bleach.
Reduce oven temperature to 250 degrees Fahrenheit.

After you finish searing, place the entire skillet in the pre-heated oven. Cook for roughly 15-25 minutes (this will be a lot shorter for a very small bird), or until the internal temperature reaches 140 degrees Fahrenheit (some people say 150 degrees). Remove from the oven, and let the breasts rest on a wire rack for 10 minutes. If you feel like the legs have gotten a little cold by now, let them warm in the oven at a low temperature for just a few minutes. All meat should have time to rest before slicing.
Remember that meat continues cooking once removed from the oven for about 5-10 degrees, so if you take the temperature and it's a few degrees below the recommended temperature, it is probably alright to remove from the oven, because it will reach that temperature while it is resting.
Now all you need to do is slice the breasts and legs into serving size pieces. Enjoy!
My family eats turkey for Christmas (even last year when I made the goose, we still had a back-up turkey), so this is what I am going to show you how to prep step-by-step for your holiday meal. Breaking the bird down and cooking the breasts separately from the rest of the bird works better, because the white meat (found in the breasts) finishes cooking at a lower internal temperature than the dark meat. Cooking them both together the traditional way overcooks the breasts. By cutting the breasts off and pan searing them you'll get the best flavor from your white meat without overcooking it, and then roasting the rest of the bird until it reaches its proper temperature will ensure that your entire bird is delicious. Also, it cooks a lot faster this way.
I'll add pictures to this post once I start prepping this turkey, since it is currently thawing.
You will need: one thawed turkey (or other whole bird of your choice); a few sharp knives; kitchen scissors; salt and pepper; plastic wrap; Ziploc bags; paper towels; salt and pepper; salt pork; vegetable oil
Note: This should be done about one to two days before you plan on cooking the bird, but doing this last minute probably won't make much of a difference.
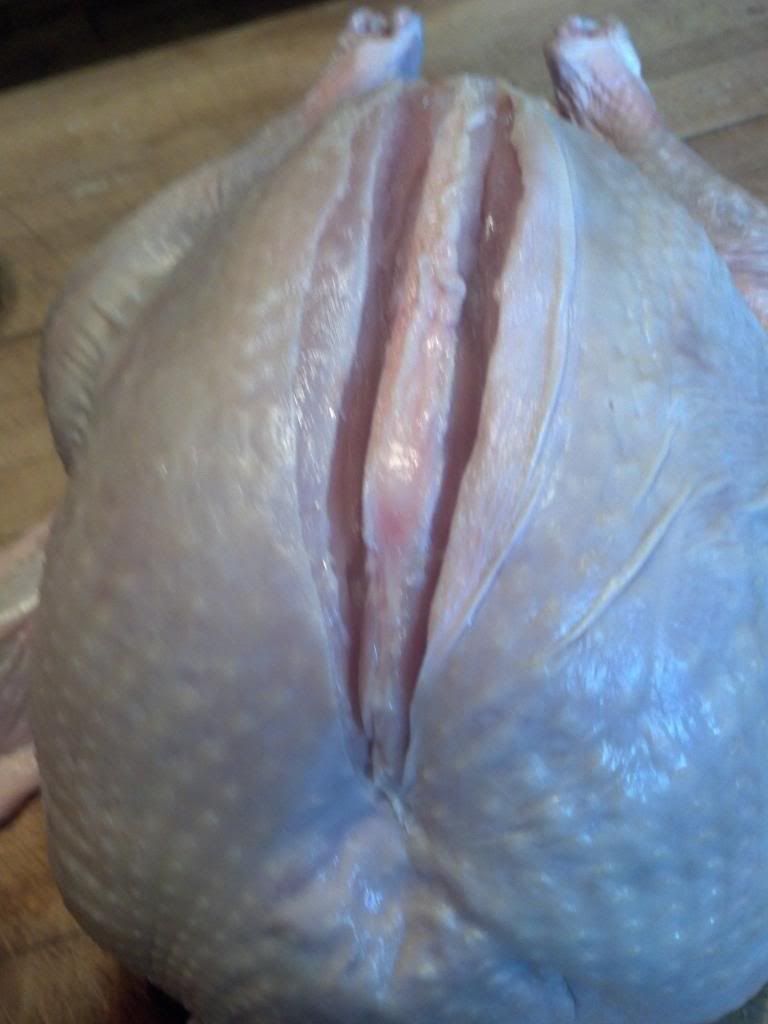
Step One: Remove the Giblets and Clean
This part is fairly obvious. Just open the bag, pull the nasty skin open and remove all the stuff the factory pushes inside the bird (hopefully, it's neatly bagged up for you, otherwise you're stuck digging around a turkey's cavity looking for that last kidney). I'd suggest saving the liver and using it in your homemade stuffing, and saving the rest of the giblets to make stock with. Rinse the cavity and the outside of the bird and dry with some paper towels. Cut off the excess skin with a sharp knife or scissors.Step Two: Remove the Breasts
Place the bird breast side up on a butcher block or large cutting board. Feel your bird to determine exactly where the sternum is. Take your sharp knife, and cut a line all the way down the sternum.You will want to cut each breast off separately. To do this, use a sharp carving or butcher knife and cut the entire left/right breast off by keeping your knife as close to the bone as possible.
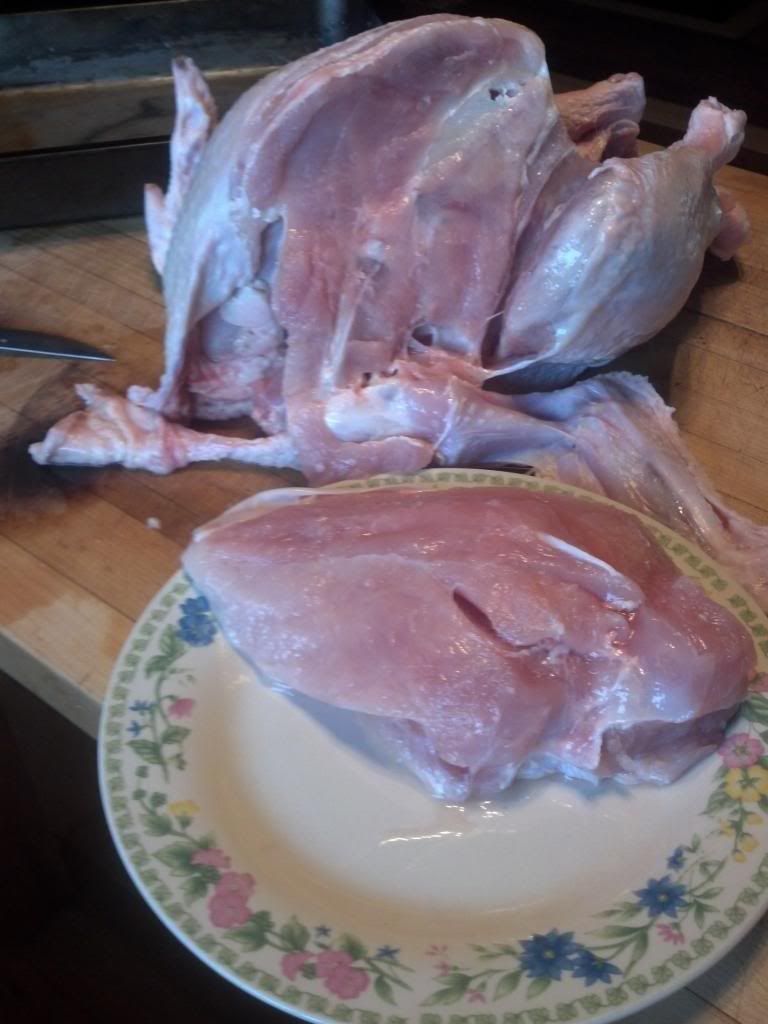
Once it's cut along the bone, remove the breast by cutting the skin, fat, cartilage, etc. that is keeping it in place. Dry this piece with a paper towel, and place skin side down on plastic wrap. Repeat with the other side. Salt and pepper the breasts, wrap them up, and put them in a zip lock bag. Refrigerate.
If you dislike the skin, take the opportunity now to cut it off. I find the best way to remove bird skin is to start cutting with a small, sharp knife keeping the knife slightly angled toward the skin. Once it is started, I think it is easier to just remove the bits keeping the skin on with a pair of scissors. If you do remove the skin, only pan sear each side for two to three minutes.
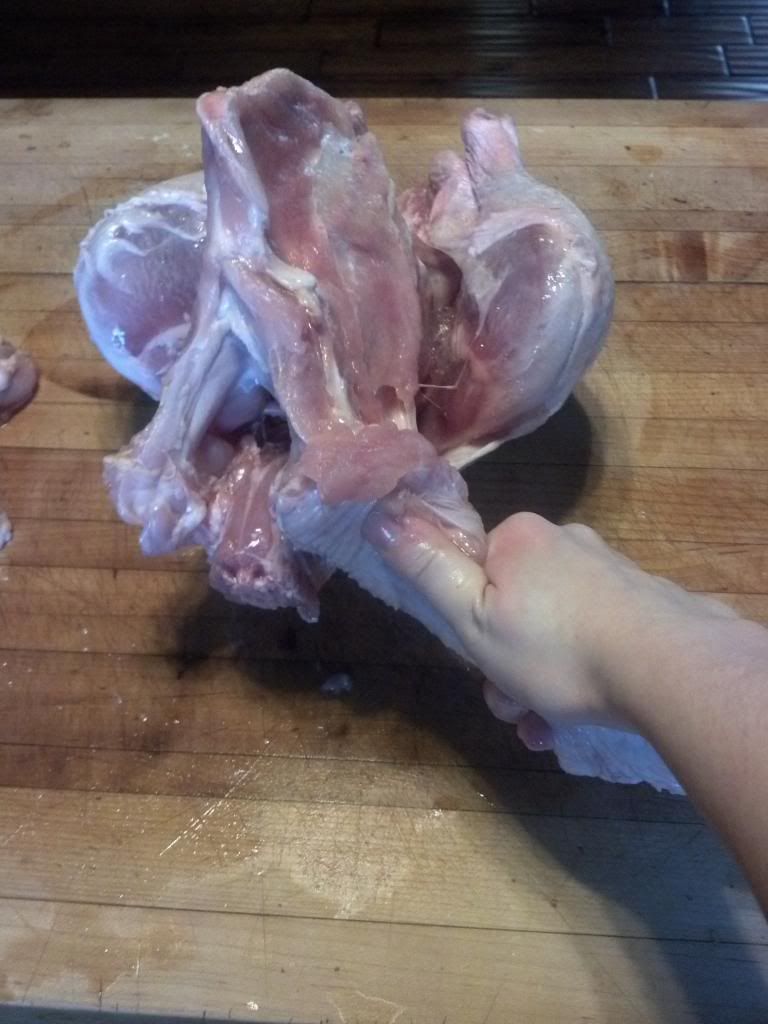
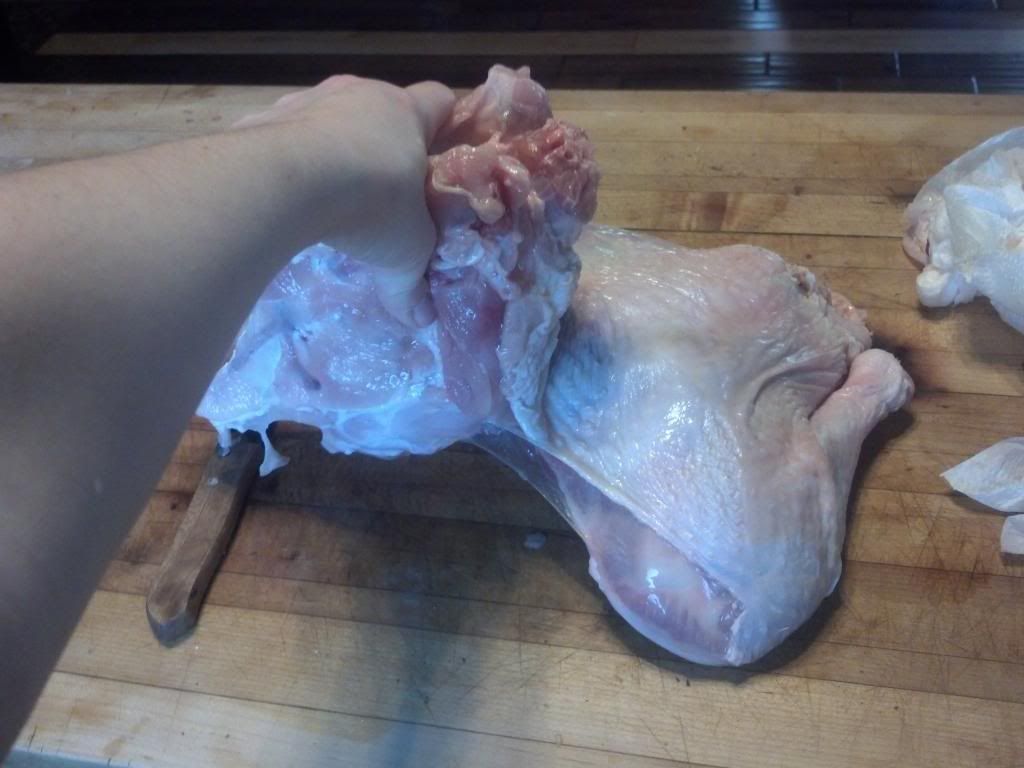
Step Three: Break the Bird's Back
Remove the wings by twisting them until the bone dislocates, then cut them off.Turn the bird over so the spine is facing up. Break the bird's back. Believe me, this sounds a lot easier than it actually is. You'll have to struggle with it for awhile, unless you are incredibly strong. It's helpful to have a friend hold one end while you bend the spine. Using a sharp knife, position it in a small space where the break is, and start cutting or pushing away. You can either discard the top carcass after reserving the wings, or save it to roast with the legs (as Chris Kimball recommends).
Note: This turkey's back was actually really easy to break, maybe you'll get lucky too.
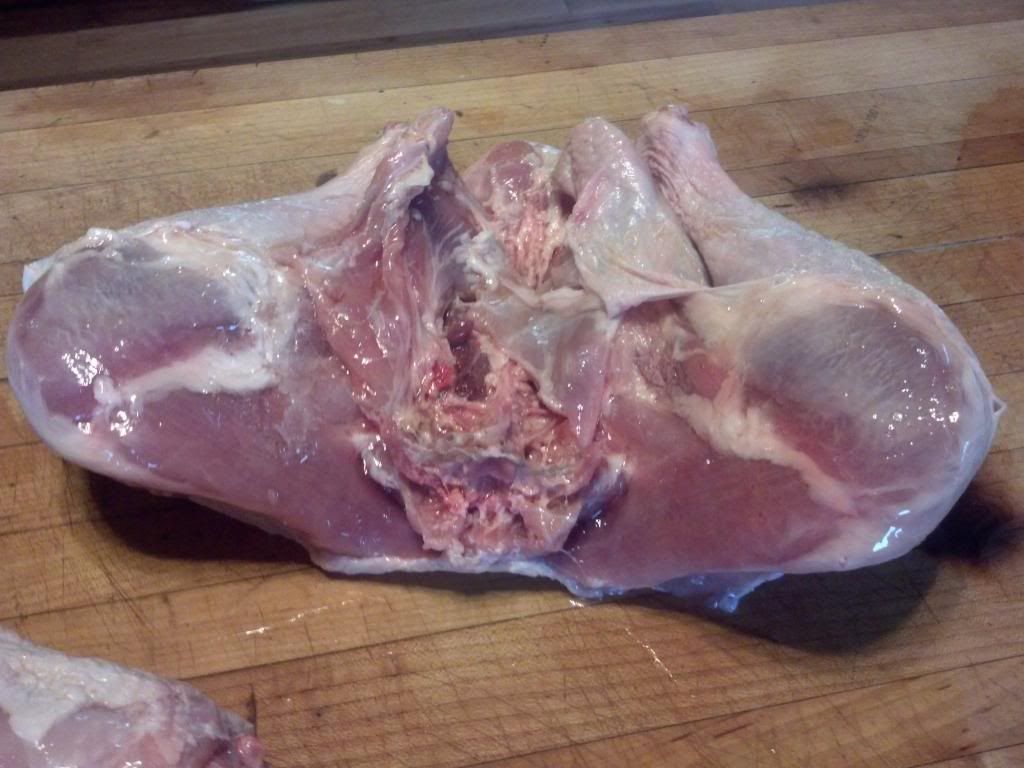
Step Four: Prep Bottom Half
Trim excess skin and fat away from the remaining leg section. Using a small, sharp knife, score the skin in a quarter inch cross-hatch, being extremely careful to not cut the meat, unless your turkey is extremely lean. Salt and pepper, and wrap this section in plastic wrap. Refrigerate.Your bird is now broken down, and ready to cook in a day or two.
Remember to disinfect your work surface with bleach.
Step Five: Roast the Leg Section
Preheat oven to 325 or 350 degrees Fahrenheit, depending on what temperature was recommended on the package your bird came in. You may want to weigh your leg section in order to determine how long the bird will take to cook. (In my experience and using my crappy oven, the leg section of a 12-15 pound bird should only take about 2.5 hours, the leg section of a 5 pound bird should only take about 30-45 minutes). Put roughly one cup of water in the bottom of your roasting pan, and put the leg section on top (if you reserved the carcass, place the legs on top of the carcass). Place your salt pork on top; alternatively you can use bacon strips if you can't find salt pork. Place in the oven. Remove the salt pork once it is stiff and beginning to brown; this should occur after about 30 minutes. Continue roasting until the legs reach 180 degrees Fahrenheit. Remove from oven.Reduce oven temperature to 250 degrees Fahrenheit.
Step Six: Sear and Roast the Breasts
In a large, oven proof skillet (cast-iron seems to work best), heat about a teaspoon of vegetable oil on medium-high heat for about three minutes. While this is heating, pat your breasts dry with paper towels, and put on a long-sleeved shirt. Once the oil is heated, place the breasts in the pan, skin side down. Cook until the skin is golden brown, then flip over and cook the other side for a few minutes (two to three is all that is needed). Don't worry about the breast's internal temperature yet.
After you finish searing, place the entire skillet in the pre-heated oven. Cook for roughly 15-25 minutes (this will be a lot shorter for a very small bird), or until the internal temperature reaches 140 degrees Fahrenheit (some people say 150 degrees). Remove from the oven, and let the breasts rest on a wire rack for 10 minutes. If you feel like the legs have gotten a little cold by now, let them warm in the oven at a low temperature for just a few minutes. All meat should have time to rest before slicing.
Remember that meat continues cooking once removed from the oven for about 5-10 degrees, so if you take the temperature and it's a few degrees below the recommended temperature, it is probably alright to remove from the oven, because it will reach that temperature while it is resting.
Now all you need to do is slice the breasts and legs into serving size pieces. Enjoy!
Sunday, December 16, 2012
Sewing with Henry: How to Shorten Shoulders on Underworks 988
I recently bought a size small model 988 binder from Underworks; I think it is a little big and will buy the extra-small next time. On this binder, the shoulders are too big for me, which makes the compression part of the shirt slide down and not do much chest binding.
This entry will show you how to shorten the shoulder straps on the 988, which is the model that only compresses at the chest and has a layer on top which is meant to look like a regular undershirt or tanktop.
I am not a professional tailor, so I apologize in advance if I make any mistakes or give the wrong advice. This is just how I altered mine.
You will need: scissors, pinking shears, thimble, needle, thread
Consult this link if you are new to sewing. Sewing Basics
After I took my measurements, I decided to take one inch off the shoulders. I wanted a comfortable fit that was not too snug, and did not bring the shirt up too tightly under my armpits.

Give the fabric a good pull to make sure your stitches will hold.
Give the fabric a good pull to make sure the stitches hold.
Repeat all steps for your second shoulder.
Your finished product should look something like this (remember, yours will look neater if you properly pin your top fabric together, unlike me):


I wore my newly altered binder all day today, and it feels great. It is no longer slipping down on me, but I still think the circumference is a little big, so I may be doing more alterations to tighten up the sides. If I do tighten the sides, I'll post the directions along with better pictures.
This entry will show you how to shorten the shoulder straps on the 988, which is the model that only compresses at the chest and has a layer on top which is meant to look like a regular undershirt or tanktop.
I am not a professional tailor, so I apologize in advance if I make any mistakes or give the wrong advice. This is just how I altered mine.
You will need: scissors, pinking shears, thimble, needle, thread
Consult this link if you are new to sewing. Sewing Basics
Step One: Measure your shoulders.
This can be done by taking a fabric tape measure and just simply start measuring right below your armpits (or wherever you want the shoulder straps to begin) and going up to the top of your shoulder and around to the back, ending where you want the shoulder straps to end. Alternatively, just measure the shoulder straps on a favorite undershirt or tank that fits well.After I took my measurements, I decided to take one inch off the shoulders. I wanted a comfortable fit that was not too snug, and did not bring the shirt up too tightly under my armpits.
Step Two: Mark where you want to cut.
Use a hard ruler and measure one inch (or your desired length) down from the shoulder seams. Draw the line at a slight angle that slops down from the neck out to the shoulders.
Step Three: Open the seams along the shoulder, then cut.
Take a seam ripper, and open up the seams that run parallel to the line you drew for both the cloth and the nylon material. Do not open up the seams that run vertical. After the seams are open, use a pair of sharp scissors and cut open the vertical seams. Then, grab a pair of pinking shears (or just the scissors if you do not own a pair) and cut the excess fabric just above the line you drew.Step Four: Sew the nylon.
Pin together the two sides that will run vertically, and then sew together the nylon centers. If hand sewing (which is what I did), just use a simple stitch that runs back and forth called running stitch and then work it again using a back stitch.Give the fabric a good pull to make sure your stitches will hold.
Step Five: Sew the fabric.
Using a slip stitch, sew together the fabric which forms the top layer. Pin together the fabric if desired (I did not pin it together because the piece is so small and since it will be worn under my shirt, I don't care much if the stitches are not completely perfect).Give the fabric a good pull to make sure the stitches hold.
Step Six: Sew together the vertical seams.
Remove your pins, and sew together the right (or left) vertical edge using what may be described as an overcast stitch. Just put your needle up through the bottom half, then down through the top half; then up through the top half and down through the bottom half; continue until it is will stitched.Your thimble will come in handy on this step. Repeat on the left side.Repeat all steps for your second shoulder.
Your finished product should look something like this (remember, yours will look neater if you properly pin your top fabric together, unlike me):


I wore my newly altered binder all day today, and it feels great. It is no longer slipping down on me, but I still think the circumference is a little big, so I may be doing more alterations to tighten up the sides. If I do tighten the sides, I'll post the directions along with better pictures.
Mission Statement
This blog is meant to follow my life as I explore transitioning from female to male. I am in my mid-twenties, live in New England, and am in my second year of law school. I currently live and dress as a female, so expect posts about haircuts and getting new clothes and other aspects of coming out.
This blog will also contain posts on how to alter binders and clothes to fit smaller trans guys, pictures of animals and landscapes, and probably all sorts of random stuff that I feel like sharing (oh, and beware, I am obsessed with knitting).
Go néirí an bóthar leat (may the road rise to meet you).
Subscribe to:
Comments (Atom)