Showing posts with label how-to. Show all posts

Sunday, March 3, 2013

Sewing with Henry: Adjusting a Tri-Top Binder

Okay, I have this tri-top that has a pretty common problem with FTMs, it has a little bit that bunches up in the front. I am not sure if this is common or not, but the bottom part of mine is way too big and hangs loose. I also think mine could be smaller since I think it doesn't compress as well as it could but I know the size extra-small will be way too small for me. I am not going to bring in all the sides, because I want to see if bringing in the bottom and taking care of the little front pooch will help the rest feel tighter and bind better. If it doesn't work, easy solution, and I'll do a "Sewing with Henry part III."

I'll add in this disclaimer that way no one flips out on me: I am not a professional tailor, there's probably a better way to do this, in hindsight I would've done the bottom part a bit differently, so if you ruin your binder, don't complain to me that you need a new one. Also, don't make your binder so tight that it is hard to breath. I can breathe perfectly fine in mine, even after I tightened up part of it. Use some common sense, I know we all have it somewhere buried deep down in that mushy thing between our ears. :)

You'll need: pencil, scissors or pinking shears, pins, needle, thread, and a thimble. Or, set up your sewing machine.

Step 1: Measure

This is pretty self-explanatory. For this part, just squeeze together the little baggy part and estimate or use a cloth measuring tape to figure out how much of a V to cut and how deep.

Here, just measure where it starts to get baggy, and using both hands or have someone help, squeeze in the excess cloth until it gets to where it feels comfortable. Unless you have help, you'll just need to estimate how much you pulled in on each side. Alternately, you can measure around your chest with a cloth measuring tape to figure out the correct size, and subtract that from the diameter of that section of the binder. We'll be bringing this part in to do some waist shaping. Hell, maybe we'll add a button to make it easier to put on! Brilliant.


So, for my front pooch I am going to measure my V down one inch from the top and cut the V  three-quarters of an inch wide. Before taking my binder off, I am going to put a mark right where my cleavage line is just to make sure everything stays centers (or alternately, you can just measure where the center is once you lay the cloth flat).

For the bottom, I am going to start my waist shaping 2.5 inches from the bottom, and I am going to take half an inch on each sides, making it a total of one inch smaller in the baggy area.

Using a pencil, cloth marker, pen, whatever, mark your measurements onto the fabric.For the bottom baggy part, put a mark on your 2.5 inch mark, and then one each side (front and back separately) put a line one quarter inch away from the seam.


You will notice that on the bottom piece, Underworks gives a quarter inch for their seam. We will aim to keep ours at a quarter inch as well for the double compression segment.

Step 2: Cut a V

First, I'd put in a bit of a waste stitch just in case it starts to unravel, though I've heard from many people that the tri-top doesn't unravel. It's just better to be safe and since this is a double compression it will help keep everything in line while we're cutting; this area is a little too small to effectively use pins.

By the way, an automatic needle threader is quite helpful, thanks grandma!


Once you get your waste stitches in, start cutting with a sharp pair of scissors or pinking shears into your V.

Step 3: Sew Up Your V

First do a back stitch around your V, being especially vigilant on the tip of the V.


Then once your back stitch is complete, we're going to mimic the Underworks seam as much as possible. I am not sure of the name of this stitch, but we're basically going to be going from the top around the cut, and then under; repeat all around until we have a nice smooth edge.


Take this opportunity to hide your knot from your starting thread. Once you've gone all the way around, you can finish here, or go back around if you're really ambitious. I stopped here because mine looks good enough for me and I feel confident that my stitches are secure.


If that was all your troubles, congratulations, you're all done! See now the little pop is gone and is doesn't show up under your shirt.


Step 4: Prepare the Bottom Part

Put in some waste stitches along your quarter inch lines. As you take the stitches out, take a mental note on how Underworks sewed the seam: the double compression is folded over and then sewn to the back of the garment. We're going to mimic that.

Once you've taken the seam apart, cut with your scissors or shears leaving about 1/4 of an inch for your seam. We'll need to cut above our 2.5 inch mark in order to prevent any strange bumping, so place some pins down in a gently sloping line going from the 2.5 inch mark up to the armpit. Cut along that leaving room for your quarter inch seam allowance.


Sew up the cut using a back stitch. Be very careful and make sure you get both layers of the front.

Turn the piece inside out, and carefully sew the front to the back from armpit down to the bottom seam. I'd also suggest using a back stitch here to make sure everything stays tight and flexible.

If you're going to use a button (I decided against it for now, I am going to try it without the button and then add it in later if I feel like it is too hard to get on), leave about an inch or so remaining and then sew on the button and either make a button hole by cutting a hole slightly bigger on the other side of the fabric and sew around it using the same technique that we used for the V.

 
As a note: my seam is kind of messy because I don't have a table to work on so therefore I couldn't use my sewing machine, and it's a little hard to sew completely straight while you're kneeling on the floor. Also, I still have the other half to do so that's why the bottom still looks a little bit loose, but it's really late now and damn, I am tired! Four forty-five AM comes quick.


Overall, I think I am just going to give up on binding, my tits are just way too big to hide:


Also, I'll probably be doing some edits on this, I am sure it's horribly written right now.


Wednesday, December 19, 2012

The Only Way to Cook a Bird -- Break Her Down

    Tired of having dried turkey? Sick of having to drench the poor thing in gravy just to get it down? Well, if you try this method, you'll never have dried poultry again. Thanks to Chris Kimball's Fannie's Last Supper I discovered this method, and ended up making a mouth watering and picture perfect goose for Christmas last year, and then a duck for Thanksgiving this year.

    My family eats turkey for Christmas (even last year when I made the goose, we still had a back-up turkey), so this is what I am going to show you how to prep step-by-step for your holiday meal. Breaking the bird down and cooking the breasts separately from the rest of the bird works better, because the white meat (found in the breasts) finishes cooking at a lower internal temperature than the dark meat. Cooking them both together the traditional way overcooks the breasts. By cutting the breasts off and pan searing them you'll get the best flavor from your white meat without overcooking it, and then roasting the rest of the bird until it reaches its proper temperature will ensure that your entire bird is delicious. Also, it cooks a lot faster this way.

  I'll add pictures to this post once I start prepping this turkey, since it is currently thawing.

You will need: one thawed turkey (or other whole bird of your choice); a few sharp knives; kitchen scissors; salt and pepper; plastic wrap; Ziploc bags; paper towels; salt and pepper; salt pork; vegetable oil

Note: This should be done about one to two days before you plan on cooking the bird, but doing this last minute probably won't make much of a difference.

Step One: Remove the Giblets and Clean

This part is fairly obvious. Just open the bag, pull the nasty skin open and remove all the stuff the factory pushes inside the bird (hopefully, it's neatly bagged up for you, otherwise you're stuck digging around a turkey's cavity looking for that last kidney). I'd suggest saving the liver and using it in your homemade stuffing, and saving the rest of the giblets to make stock with. Rinse the cavity and the outside of the bird and dry with some paper towels. Cut off the excess skin with a sharp knife or scissors.


Step Two: Remove the Breasts

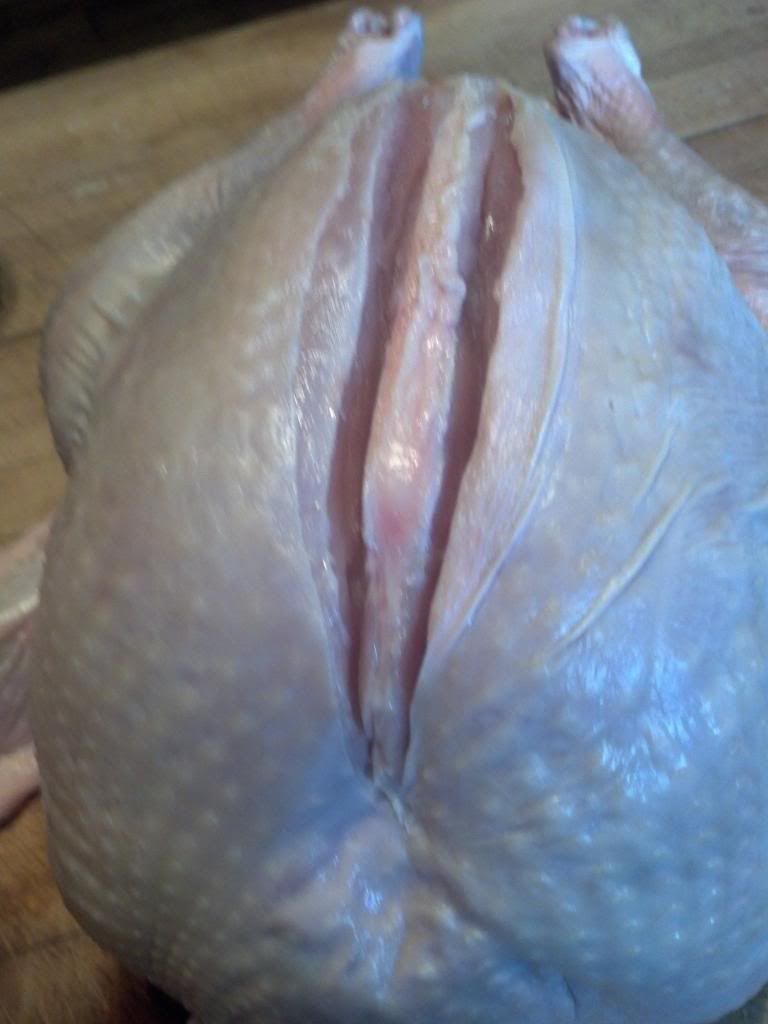
Place the bird breast side up on a butcher block or large cutting board. Feel your bird to determine exactly where the sternum is. Take your sharp knife, and cut a line all the way down the sternum.


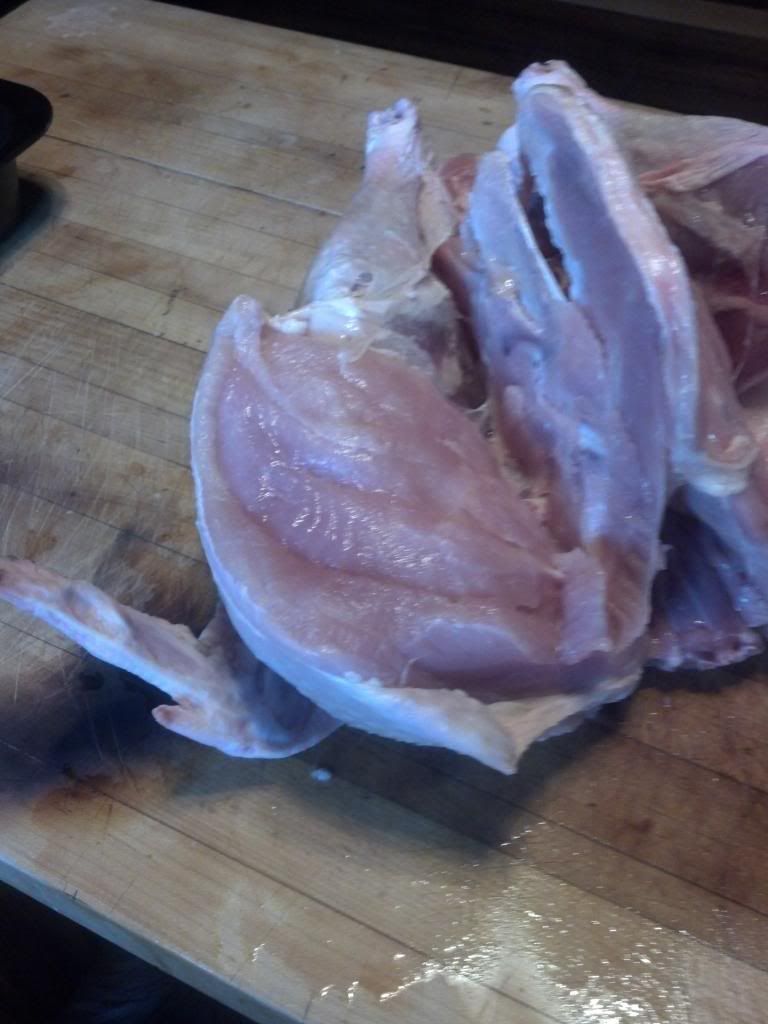
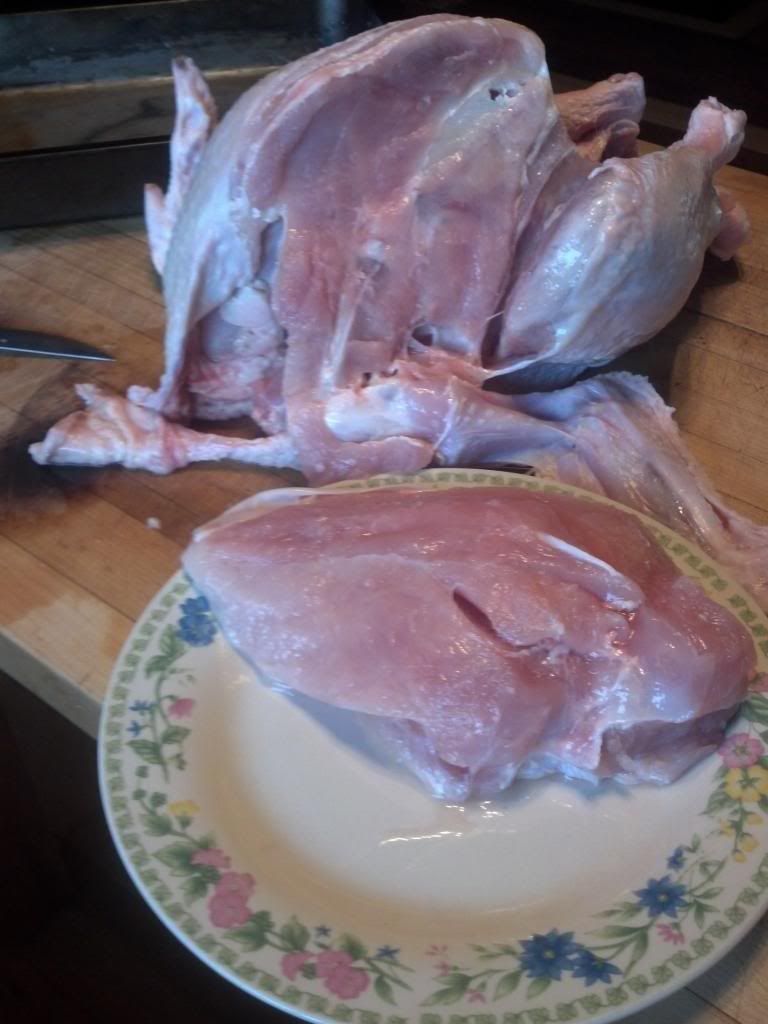
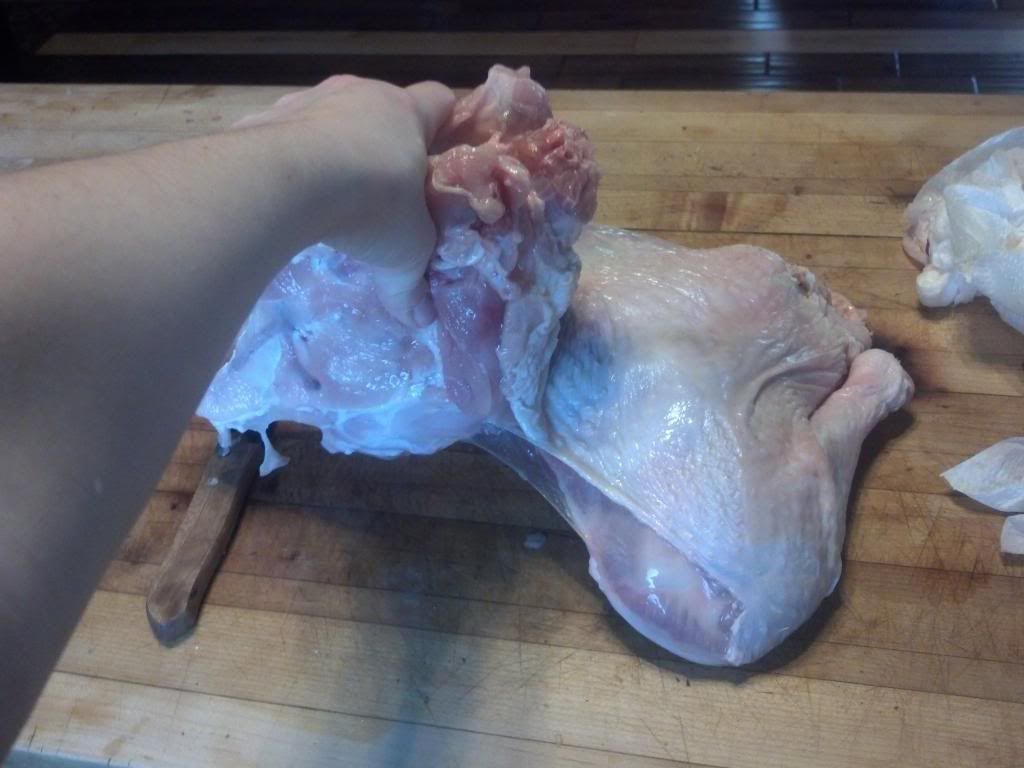
You will want to cut each breast off separately. To do this, use a sharp carving or butcher knife and cut the entire left/right breast off by keeping your knife as close to the bone as possible.


 Once it's cut along the bone, remove the breast by cutting the skin, fat, cartilage, etc. that is keeping it in place. Dry this piece with a paper towel, and place skin side down on plastic wrap. Repeat with the other side. Salt and pepper the breasts, wrap them up, and put them in a zip lock bag. Refrigerate.


If you dislike the skin, take the opportunity now to cut it off. I find the best way to remove bird skin is to start cutting with a small, sharp knife keeping the knife slightly angled toward the skin. Once it is started, I think it is easier to just remove the bits keeping the skin on with a pair of scissors. If you do remove the skin, only pan sear each side for two to three minutes.

Step Three: Break the Bird's Back

Remove the wings by twisting them until the bone dislocates, then cut them off.


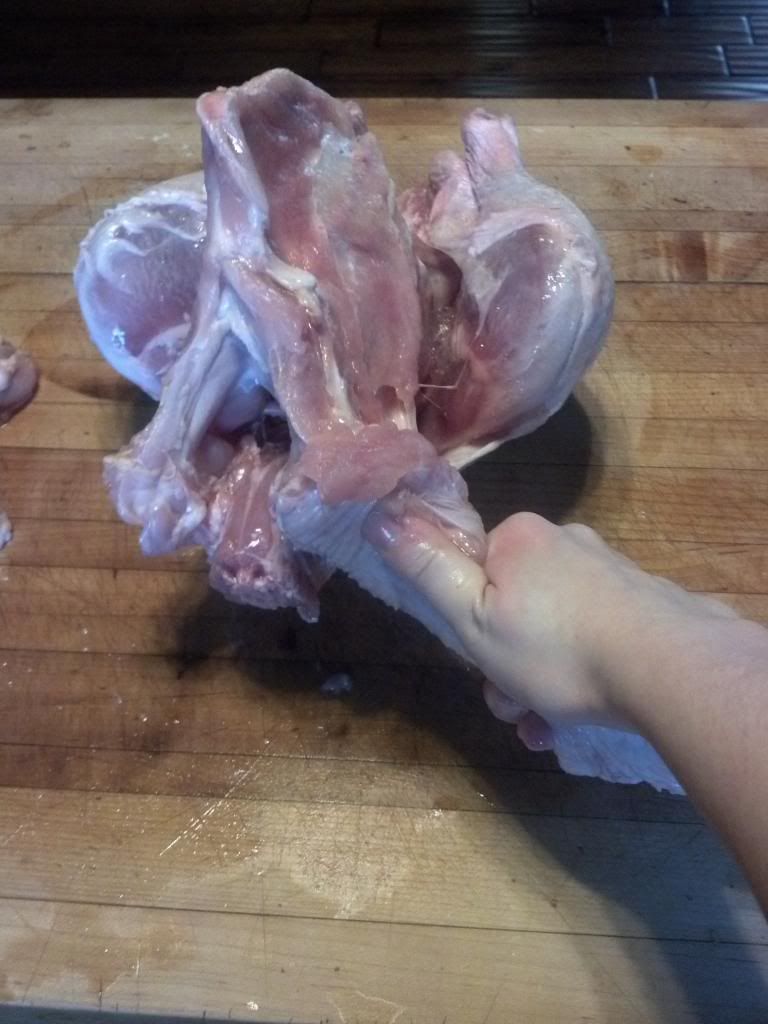
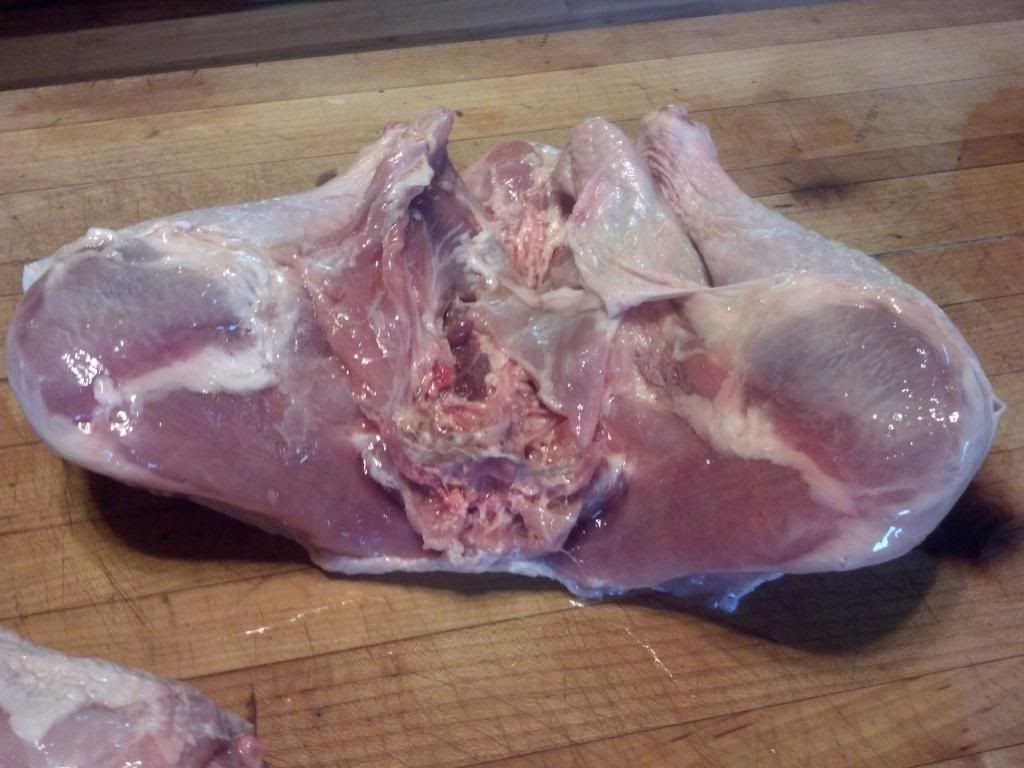
Turn the bird over so the spine is facing up. Break the bird's back. Believe me, this sounds a lot easier than it actually is. You'll have to struggle with it for awhile, unless you are incredibly strong. It's helpful to have a friend hold one end while you bend the spine. Using a sharp knife, position it in a small space where the break is, and start cutting or pushing away. You can either discard the top carcass after reserving the wings, or save it to roast with the legs (as Chris Kimball recommends).

Note: This turkey's back was actually really easy to break, maybe you'll get lucky too.


Step Four: Prep Bottom Half

Trim excess skin and fat away from the remaining leg section. Using a small, sharp knife, score the skin in a quarter inch cross-hatch, being extremely careful to not cut the meat, unless your turkey is extremely lean. Salt and pepper, and wrap this section in plastic wrap. Refrigerate.


Your bird is now broken down, and ready to cook in a day or two.

Remember to disinfect your work surface with bleach.

Step Five: Roast the Leg Section

Preheat oven to 325 or 350 degrees Fahrenheit, depending on what temperature was recommended on the package your bird came in. You may want to weigh your leg section in order to determine how long the bird will take to cook. (In my experience and using my crappy oven, the leg section of a 12-15 pound bird should only take about 2.5 hours, the leg section of a 5 pound bird should only take about 30-45 minutes).  Put roughly one cup of water in the bottom of your roasting pan, and put the leg section on top (if you reserved the carcass, place the legs on top of the carcass). Place your salt pork on top; alternatively you can use bacon strips if you can't find salt pork. Place in the oven. Remove the salt pork once it is stiff and beginning to brown; this should occur after about 30 minutes. Continue roasting until the legs reach 180 degrees Fahrenheit. Remove from oven.

Reduce oven temperature to 250 degrees Fahrenheit.

Step Six: Sear and Roast the Breasts 

In a large, oven proof skillet (cast-iron seems to work best), heat about a teaspoon of vegetable oil on medium-high heat for about three minutes. While this is heating, pat your breasts dry with paper towels, and put on a long-sleeved shirt. Once the oil is heated, place the breasts in the pan, skin side down. Cook until the skin is golden brown, then flip over and cook the other side for a few minutes (two to three is all that is needed). Don't worry about the breast's internal temperature yet.


After you finish searing, place the entire skillet in the pre-heated oven. Cook for roughly 15-25 minutes (this will be a lot shorter for a very small bird), or until the internal temperature reaches 140 degrees Fahrenheit (some people say 150 degrees). Remove from the oven, and let the breasts rest on a wire rack for 10 minutes. If you feel  like the legs have gotten a little cold by now, let them warm in the oven at a low temperature for just a few minutes. All meat should have time to rest before slicing.

Remember that meat continues cooking once removed from the oven for about 5-10 degrees, so if you take the temperature and it's a few degrees below the recommended temperature, it is probably alright to remove from the oven, because it will reach that temperature while it is resting.

Now all you need to do is slice the breasts and legs into serving size pieces. Enjoy!

Sunday, December 16, 2012

Sewing with Henry: How to Shorten Shoulders on Underworks 988

I recently bought a size small model 988 binder from Underworks; I think it is a little big and will buy the extra-small  next time. On this binder, the shoulders are too big for me, which makes the compression part of the shirt slide down and not do much chest binding.

This entry will show you how to shorten the shoulder straps on the 988, which is the model that only compresses at the chest and has a layer on top which is meant to look like a regular undershirt or tanktop.

I am not a professional tailor, so I apologize in advance if I make any mistakes or give the wrong advice. This is just how I altered mine.

You will need: scissors, pinking shears, thimble, needle, thread

Consult this link if you are new to sewing. Sewing Basics

Step One: Measure your shoulders.

  This can be done by taking a fabric tape measure and just simply start measuring right below your armpits (or wherever you want the shoulder straps to begin) and going up to the top of your shoulder and around to the back, ending where you want the shoulder straps to end. Alternatively, just measure the shoulder straps on a favorite undershirt or tank that fits well.

   After I took my measurements, I decided to take one inch off the shoulders. I wanted a comfortable fit that was not too snug, and did not bring the shirt up too tightly under my armpits.

Step Two: Mark where you want to cut.

   Use a hard ruler and measure one inch (or your desired length) down from the shoulder seams. Draw the line at a slight angle that slops down from the neck out to the shoulders.


Step Three: Open the seams along the shoulder, then cut.

   Take a seam ripper, and open up the seams that run parallel to the line you drew for both the cloth and the nylon material. Do not open up the seams that run vertical. After the seams are open, use a pair of sharp scissors and cut open the vertical seams. Then, grab a pair of pinking shears (or just the scissors if you do not own a pair) and cut the excess fabric just above the line you drew.

Step Four: Sew the nylon.

    Pin together the two sides that will run vertically, and then sew together the nylon centers. If hand sewing (which is what I did), just use a simple stitch that runs back and forth called running stitch and then work it again using a back stitch.
   Give the fabric a good pull to make sure your stitches will hold.

Step Five: Sew the fabric.

   Using a slip stitch, sew together the fabric which forms the top layer. Pin together the fabric if desired (I did not pin it together because the piece is so small and since it will be worn under my shirt, I don't care much if the stitches are not completely perfect).
   Give the fabric a good pull to make sure the stitches hold.

Step Six: Sew together the vertical seams.

    Remove your pins, and sew together the right (or left) vertical edge using what may be described  as an overcast stitch. Just put your needle up through the bottom half, then down through the top half; then up through the top half and down through the bottom half; continue until it is will stitched.Your thimble will come in handy on this step. Repeat on the left side.

Repeat all steps for your second shoulder.

Your finished product should look something like this (remember, yours will look neater if you properly pin your top fabric together, unlike me):
 

I wore my newly altered binder all day today, and it feels great. It is no longer slipping down on me, but I still think the circumference is a little big, so I may be doing more alterations to tighten up the sides. If I do tighten the sides, I'll post the directions along with better pictures.